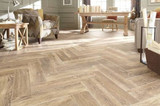
Loose Lay Vinyl Plank in a Herringbone Pattern

Grant, we haven't installed it this way ourselves, but I checked with the team, and there is no reason it shouldn't work just due to your using Loose Lay. There will be hassles. You accept that when you decide to do a herringbone look in the first place, and I'm guessing you know what those are generally. I still think we can give you some tips that will helpful with Loose Lay specifically. If you haven't watched it yet, look at our "How To Install Loose Lay" video. It will help some of this make more sense.
All planks within the room must meet each other with factory cuts.
Because of the way Loose Lay works, all of the planks must meet each other perfectly, with no gaps in any seam. This means that no man-made cuts may be in the ' field'. Any man made cuts would have to be up against the wall. Take a look at this picture:
Two planks of Loose Lay Vinyl meeting end to end"
These planks are cut to keep the tops especially snug, creating something close to a seal. What this means is that in addition to having to make machine quality cuts across any plank, you would also have to cut in a way that replicates this angle. It's a lot to ask of a saw and a T-square, to say nothing of a box cutter. To keep your machine cuts in the room, and man-made cuts up against the wall, you'll need to do the following:
1. The installation must start in the center of the room and work outward in all directions toward the walls.
It will be difficult keeping the beginning of this pattern straight and true since it is not fastened to the
subfloor. There is the chance that the pattern could slip or run off and then eventually it will begin to gap everywhere. Starting out using adhesive would be helpful. To see how adhesives can be used with our Loose Lay, you can scroll the video above to the 5:55 mark, or click this link to see it large (and at that point) on YouTube.
A snapshot from our video - cuts go to the walls:
2. It follows that you will wind up use full planks throughout the room, only cutting them to meet the wall.
Keep in mind that at the wall, the planks must still be snug. This means that your man made cuts have to be very good, something no different from any other loose lay installation.
3. You will need to order 15-20% extra for waste, rather than the usual 10-15%.
This is the same as one would do just when installing any plank floor at a diagonal. The reason is that when you're just installing along the walls normally, the pieces you cut at the end of a row can usually be used to start another row. With diagonals and herringbones this simply doesn't work out as often. For instance, if you start a row or section in the middle and when you get to the wall on one side you need to use 2/3 of a plank, then on the other side you not be able to use the 1/3 you cut off because you will need 2/3 of a plank on that side too. While you still will use much of what you cut, it may not work out as often as it does in a standard installation.
I hope this has been helpful!
Ricky and Shawn, both experienced installers, and Hayley, a student of flooring like myself, are the smart people who provided these answers.
- - - -
– – – –
David is has written and made videos about flooring products and installation since 2011 at Floors To Your Home (.com), where he is also the PPC Manager, a Researcher, a Website & Marketing Strategy Team member, Videographer, Social Strategist, Photographer and all around Resource Jito. In my spare time I shoot and edit video, put together a podcast, explore film history, and mix music (as in ‘play with Beatles multi-tracks’). Connect with
W. David Lichty
Follow Team Floors To Your Home on Facebook

 Brown Tone
 Unfinished
 Red Tone
 Golden Tone
 Gray Tone
 Light Tone
 Medium Tone
 Dark Tone
 Brown Tone
 Red Tone
 Golden Tone
 Gray Tone
 Light Tone
 Medium Tone
 Dark Tone
 Brown Tone
 Red Tone
 Golden Tone
 Gray Tone
 Light Tone
 Medium Tone
 Dark Tone
 Multi Color


