5. Comparing Hardwood Installation Methods

You’ve done your research. You’ve measured your room. You’ve spent hours looking at Pinterest boards and interior design blogs searching for that AHA! moment. Finally you’ve found the hardwood floor of your dreams! It matches your color scheme. It’s in your price range. There’s only one question: How does it install? We’re going to give you a quick and easy rundown of hardwood installation methods, their pros and cons, and how to know which one is right for you.
First off, what type of wood flooring are you looking at? Is it solid hardwood, or is it engineered? Not sure? Here’s how to tell:
Solid hardwood is made from a single piece of wood, whereas engineered hardwood is composed of layers. Each confer their own benefits to your home and both make gorgeous long-lasting floors. Watch our very own Brian take you through the basics of solid and engineered floors here:
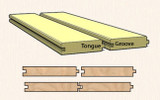
Both solid and engineered hardwood floors can also feature tongue and groove
plank design:

Tongue and groove planks are a bit like puzzle pieces: they’re designed to fit
together! Of course, installing a floor goes beyond just sliding the tongue
into the groove and hoping for the best. For solid hardwood floors, tongue and
groove planks need to be nailed or stapled. Engineered hardwood tongue and
groove planks have a few more options: in addition to nailing or stapling,
engineered hardwood can also be glued down or floated without glue. Still with
us? Great! Let’s break it down a little further.
NAIL OR STAPLE
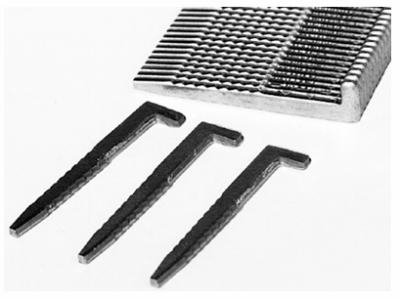
Nailing a hardwood floor involves…you guessed it, nails. Flooring nails look
like the nightmare lovechild of a golf tee and a bobby pin, and can be found
at your local big box hardware store.

Be sure to check the manufacturer’s instructions for more specifics on
exactly which flooring nail your floor needs.
If a hardwood floor includes nailing in its installation options, odds are
it includes stapling too. There are a couple of factors to look at when
you’re deciding whether to nail or staple your hardwood, like:
• Moisture. It’s a well-known fact that moisture is hardwood Enemy Number One. Stapled floors are fastened tighter to subfloors than their nailed counterparts; if you live in an area prone to humidity you’ll need to account for hardwood’s natural expansion and contraction in order to prevent cracking. Nails allow for some more give.
• Hardwood Species. A wood’s hardness (measured on the Janka scale) varies from species to species, i.e., maple has a different hardness rating than walnut, which has a different hardness rating than ebony, etcetera, etcetera, etcetera. Exotic wood tends to be harder; you’ll want to nail exotic hardwood flooring planks because the force needed to get a staple through a piece of exotic hardwood can cause your plank to split.
FLOAT
Floating installation takes its name from the way hardwood planks “float”
over the subfloor instead of being directly attached to it. It obtains
stability by acting as a unit; each plank joins together to form a single
surface. It’s worth noting that the tongue and the groove still need to be
glued together if you opt to float a T & G floor. Why float a hardwood
floor?
• Cost. Since it’s less labor-intensive to float a floor than it is to glue it, nail it, or staple it, floating engineered hardwood floors tends to have a lower overall price.
• Mobility. Since floating hardwood is not attached to the subfloor, it has a little more wiggle room for hardwood’s natural expansion and contraction.
• Ease of Installation. This is a great method for those who are looking to DIY! Of course, it’s still critical to do your research and read the manufacturer’s instructions thoroughly, regardless of which installation method you choose.
GLUE
While the thought of gluing down your hardwood floors might not sound
appealing when floating installation is an option, glue-down installation
instills a pair of important benefits:
• Longevity. Gluing your flooring down adds an element of permanence. It will stay in place for many, many years to come.
•
Sound Reduction. Glue eliminates that little bit of space
left between floor and subfloor, creating a solid, cohesive surface. This
means there’s no bounce when you step on the floor, and no sound of the
hardwood making contact with the subfloor.
As to glue type, this will depend on your subfloor.
CLICK TOGETHER
Not all engineered hardwood is tongue and groove: some clicks together!
Click together installation is a floating method, so it’s not going to be
attached to your subfloor. The best part about click together installation
is…you guessed it…that it clicks together! Unlike floating a tongue and
groove hardwood floor, click together hardwood is genuinely glue-free! This
is another really great option for the weekend warrior looking to install
their own hardwood floor. Click together installation may be called by
different names depending on the brand of flooring you purchase, so (and I
know I’m getting repetitive here…) be sure to check your instructions.
Do you have questions about the perfect hardwood installation method for you? Call 1-800-804-5251 or click on FloorsToYourHome.com to chat with one of our flooring experts today! For customers in the central Indiana area (or anywhere else, if you’re up to a road trip!), visit our retail stores in Indianapolis and Noblesville.

 Brown Tone
 Red Tone
 Golden Tone
 Gray Tone
 Light Tone
 Medium Tone
 Dark Tone
 Brown Tone
 Red Tone
 Golden Tone
 Gray Tone
 Light Tone
 Medium Tone
 Dark Tone
 Multi Color
